


[3D Printing for Beginners] Learn to use the Bambu Lab 3D printer in one minute - how to use multi-color printing?
Multicolor printing is one of Bambu Lab's most impressive features. We've noticed that many makers are unfamiliar with the AMS automatic feeding system on their new Bambu Lab 3D printers . You might also encounter similar situations, such as: How do I change materials using AMS? What is the workflow for color 3D printing?
This article simplifies and condenses all the steps into a practical AMS tutorial video, helping you quickly learn and get started!
Before you begin - AMS installation video steps
Multicolor 3D Printing Video Tutorial
【Step 1】Equipment Preparation - Configure Cable Information
Before using Bambu Lab's multicolor printing function, you need to load the materials into AMS and configure the corresponding cable information. If you are using official Bambulab cables, AMS will automatically identify the cable type and color via RFID. If you are using third-party cables, you need to manually configure this information. The specific steps are as follows:
1. Loading AMS • Open AMS and insert the wire into the designated slot according to the instructions.
• If it is an official Bambulab cable, AMS will automatically read the RFID and identify the cable information.
2. Configure cable information (for third-party cables)
• Open the AMS configuration interface.
• Select the slot to be configured and manually enter the type and color information of the cable.
【Step Two】Bambu Studio Setup
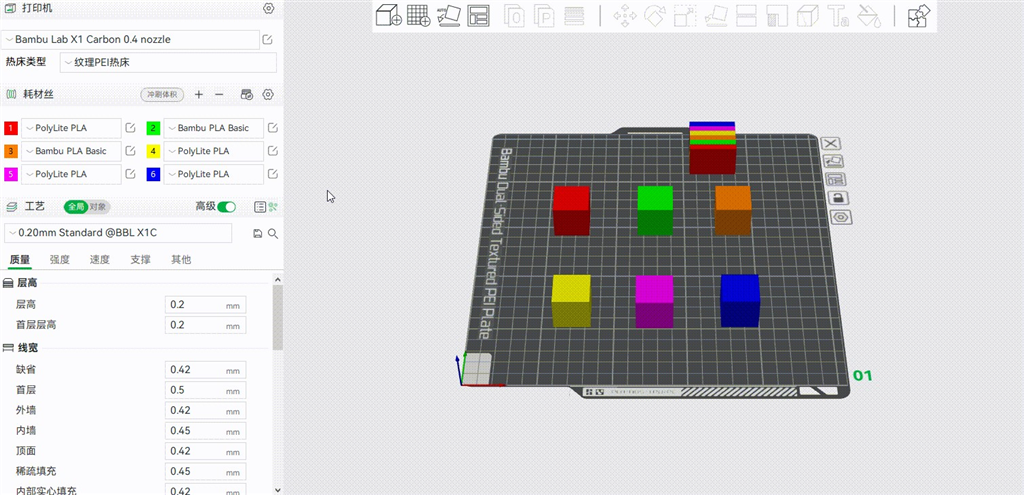
1. Manage the cables in the project.
In the left sidebar of the project, you can see a list of all cables:
• Add cable: Click the + button to add a new cable to the project.
• Delete cable: Click the ➖ button to delete the last cable.
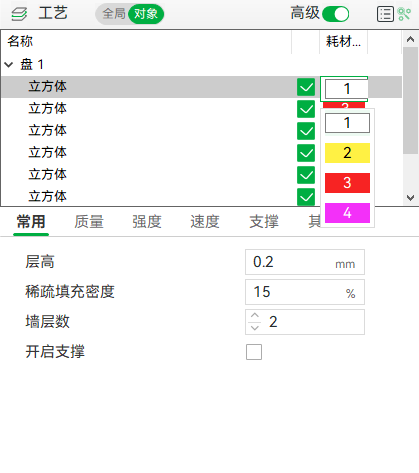
2. Single-color painting
• Select the "object" whose color you want to change.
• In the object list in the left sidebar, click "Object" and then click the color swatch to select the color you want.
• Select the "object" whose color you want to change.
• In the object list in the left sidebar, click "Object" and then click the color swatch to select the color you want.
3. Multi-color/ partial coloring
Click "Color" ➡︎ In the upper right corner, under "Cables," first select the color you want.
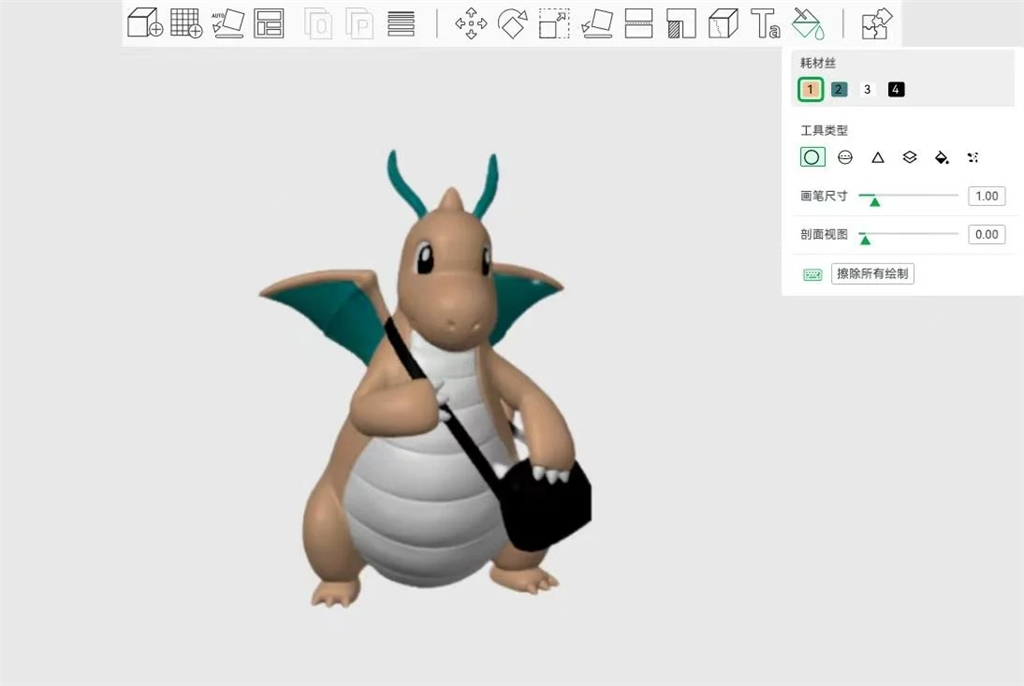

• Circle: Like a paintbrush, it can draw colors on a flat surface.
• Sphere: Colors the area of the "sphere" in the model.
• Triangle: Color the area of any triangle in the model.
• Height Range: For large areas of coloring , the area can be adjusted.
• Fill: Automatically detects and colors specific shapes.
• Gap filling: Can be used to color concave surfaces.
[Step 3] Slice & Send to Print
1. Slice and import to SD card:
• Slicing with Bambu Studio eliminates the need to pre-select AMS slot information.
• Import the sliced files to the SD card.
2. Select the file and print it on the printer:
• Select the print file from the SD card on the printer, and the printer will automatically match the cable.
• If you need to modify the automatic matching, you can manually select the slot corresponding to the color on the printer screen.
For more detailed guidelines and steps, please refer to the Bambu Lab Wiki and AMS Troubleshooting Guide .
Did you enjoy this sharing session?
Learn more about 3D printing filaments and 3D printers , or contact us for high-quality 3D printing OEM services.
Follow our fan page and stay up-to-date with the latest news:
https://www.facebook.com/3dmart.com.tw/
https://www.instagram.com/3dmart/