


[Unboxing and Real-world Testing] Flashforge UV-curable 3D printer: Objects are four times larger!
While both are desktop sizes, the print volume is 4 times larger? Meeting the needs of large-sized objects or producing a large number of small parts, the newly launched " Flashforge Foto 13.3-inch Photopolymer 3D Printer " is here! With a print volume of up to 292 x 165 x 400mm, let's unbox it step by step and see the real-world test results:
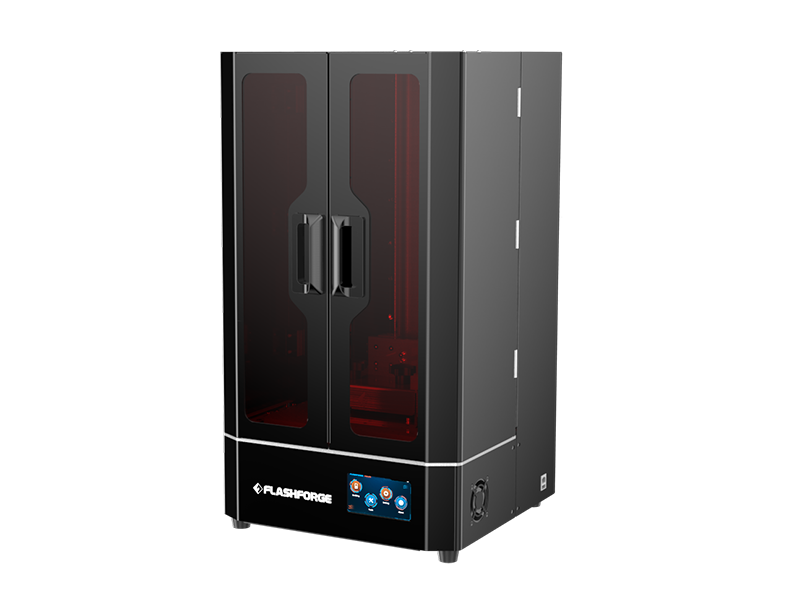
3D printers are used for developing samples and mass production, emphasizing efficiency! The common goal is to print the most objects in the shortest amount of time. The Flashforge Foto 13.3 has a total production capacity of 19 liters, which is 4 times larger than that of a typical photopolymer 3D printer . In addition to being able to print larger objects, it can also efficiently mass-produce jewelry, replace parts, assemble models, etc.

First, unpack the Flashforge Foto 13.3 photopolymer 3D printer . Open the sliding doors on the left and right sides to fully expand the enclosed space inside the machine. Then, loosen the fixed pivot above the printing platform and remove the sponge block in the middle. You will then see a fully equipped toolbox and resin materials inside.

The package contains:
1 can of Flashforge resin
Power cord
Instruction manual
Metal/Plastic spatula
.brush
.Gloves
. USB
wrench
.tweezers
.pliers
Filter paper

3 steps of calibration
Before initial unpacking, a calibration process is performed to ensure stable and correct machine operation. The calibration procedure for the photopolymer 3D printer primarily aims to calibrate the position of the 3D printing stage and LCD panel system via Z-axis alignment before printing.
1. Loosen the fixing screws
1. Loosen the fixing screws
Remove the resin tank and loosen the screws securing the printing platform (the platform does not need to be removed).
2. Place the paper and start with one click.
Place three A4 sheets of paper on the LCD panel, click "Tools" > "Z-axis Movement" on the touch screen, and then select "Reset". The printing platform will automatically descend until it is flush with the bottom LCD panel. During the process, the distance between the platform and the bottom panel will be displayed on the touch screen in real time. When the distance on the screen shows "Z: 0.00mm", it means that the platform has been completely lowered to the bottom.

3. Tighten the screws and lift the platform.
After completely flattening the bottom paper and LCD panel, tighten the platform's fixing screws again. Pull the three sheets of paper back and forth until they can be pulled out, but with some resistance. Finally, click "Highest" on the screen, and the platform will rise to the top again, completing the Z-axis calibration.

(After confirming the above 3 steps and checking if the bottom LCD curing light is on, lock the resin tank and you can start printing.)

Next, shake the photosensitive resin and pour it into the resin tank. The amount of resin can be based on the marking line in the resin tank. Finally, close the shielding door of the 3D printer.
Start 3D printing
1. Upload Print File <br> On the touch screen, select "Print". You can choose a system default model or upload a 3D model file using a USB.

2. Click Start <br> When you select the model to be printed, the screen will automatically display the model's appearance, estimate the 3D printing time, layer thickness, and resin name. Once you confirm that everything is correct, you can begin.

After photopolymer 3D printing is complete, the model surface will be covered with liquid resin. Soak the object in alcohol to clean off any remaining resin, then use a UV curing lamp to quickly cure the model. ( Click here to see: Phrozen Mighty Photopolymer 3D Printing Tutorial: Even Movable Models Can Be Printed! )

We can print 3D-printed dragons up to 13 x 13 x 15.5cm in size. From the fine particles on the chest and the wrinkles on the wings to the contours of the face, the level of detail and precision is incredibly high. Create your own Titan, a creature Godzilla hasn't even portrayed yet! Did you enjoy this sharing? The desktop size and extra-large print volume meet any size requirements for your objects. SanDiMa offers more than just 3D printing . Contact us now to learn more about the Flashforge Foto 13.3-inch UV-curing 3D printer .
Follow our fan page to stay up-to-date with the latest news: https://www.facebook.com/3dmart.com.tw/